How To Resize Scanned Document to 500kb for Web Page
The simplest way to resize and make your scanned document compatible with web pages is by reducing the scanned document to 500kb using your Microsoft office picture management.
People have always be confused and loose many opportunities as a result of not knowing how to resize their scanned document to the required size which is always in 500kb without knowing that it is very simple with your Microsoft office picture management.
Steps to resize to 500kb(web page size)
- Drag out, or copy out the scanned document from the scanned folder to your desktop.
- Right click on the document.
- Open the scanned document with Microsoft office picture management.
- You will see a folder like this.
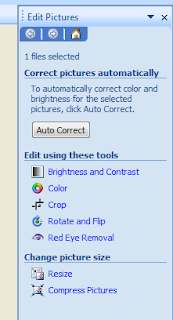
- First click on ''Auto Correct'' to make the scanned document more brighter.
- Click on 'Edit Pictures'. A folder like this will open.
- Now click on 'Compress Pictures'. NOTE: I didn't say resize this time.
Normally your document will be on don't compress.
Then click on Web Pages.
And your scanned document will be resized to 500kb which is the acceptable resize for online forms filling.
NOTE: many will tell you that you need a software like Picasa or Photoscape to do this, but that is too regorious. just follow the simple process above.


0 comments:
Post a Comment